Friday, February 28, 2014

Basic Sketch #2

Here is Kiwi Lane's Basic Sketch #2:


And here is my version:


For this challenge you are not required to use the Kiwi Lane design templates to participate, so I thought I would spice things up a bit and NOT use my templates!!!

I gotta say, it was strange...


I also figured since I was mixing things up, why not dust off my old Coluzzle alphabet stencils? Nowhere NEAR the clean results of my Cricut, but it was still fun to do again!

Visit HERE to see other ideas or even to participate yourself! It's a great way to win some free templates... and the worst that can happen is that you actually finish a scrapbook page!!

Not that I sometimes don't finish...


Sunday, February 23, 2014

DT Doodles #4

You know, it doesn't matter if I get 2 weeks, 1 week, or 3 years... I'm going to finish at the last second!

Here is Kiwi Lane's DT Doodles #4:


And here is my slightly altered take:


I love My Mind's Eye paper!!! It makes it impossible to go wrong with color choice! Always classy!


I have these super old pictures that I love and have been hoarding waiting for all the stars to align and all the perfect papers to appear...

So I decided to suck it up and actually *gasp* scrapbook them! It's only been 12 years...


I like to pop up all the petals of my favorite Kiwi Lane flowers.

Go HERE to see other entries!

Almost midnight...

Ice cream time!!!

Sunday, February 16, 2014

Basic Sketch #1

I am SOOOOOO happy Kiwi Lane started another sketch challenge for the off-weeks of DT Doodles!!!

Introducing Basic Sketches #1:


And here is my 2-page version:


The stars immediately went July 4th to me. This was all I could think about while watching the Olympics... and since I made this page while watching the Olympics... It all worked out!

 
I really like the stars with the off-set title. Definitely using this look again!

Visit HERE to see other Basic Sketch interpretations!

Go USA!!!

DT Doodles #3

I always love a good Kiwi Lane DT Doodle sketch!

Here is DT Doodles #3:


Yay! No 2-page altering required!!!

Here is my version:


I LOVE these colors! This is probably my favorite layout I've created in awhile! The photos will be lovely shots of me and my husband taken by a 7-year-old on my last birthday.


Yes, I am thirty one.

Wa-hoo.

Visit Kiwi Lane HERE to see other versions of this weeks sketch :)

Wednesday, February 12, 2014

Felt Rose Wreath

My Mom and I wanted to make Valentine's wreaths. So we did what anyone would have...
we Googled it!

Here is what we came up with:


I REALLY like it!!!

Want to know how to make it?

Of course you do!

Supplies:
-straw wreath (leave the plastic on)
-1 1/2 to 2 yards of red felt
-glue gun and TONS of glue sticks
-scissors
-circles to trace
-10mm and 5mm pearls

To make the roses, cut out a circle of felt. Mine were about 6 1/2 inches for the big ones and 3 1/2 inches for the little ones. You can cut out a couple at once to save time :)


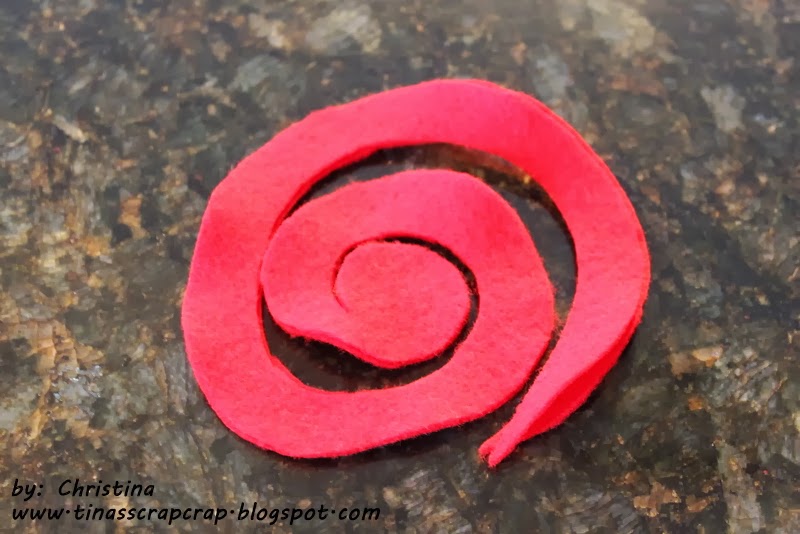
Cut a spiral into the circle, leaving a circle in the middle. Again, I did 2 at once.


Ok, now it's one at a time! Roll up your circle starting with the outside pointed edge of your spiral.


Keep rolling until you get to the middle circle you left when cutting. This is where you glue down your rose. If you cannot handle glue gun burns, walk away now; this project is not for you!


Here is your finished rose! You can keep it as loose or tight as you want. The felt is very forgiving! Just play with it. If you really mess up, just unroll and start again.

My finished roses were about 3 inches for the big ones and 1 3/4 inches for the little ones.


Repeat...

Repeat...

Repeat...

I needed 13 big roses and 103 little ones. It depends on how much you squish them in there and how tight you keep your roses.

Cut long strips of the felt as wide as you are comfortable and wrap up that awful straw wreath. Trust me, it is a BAZILLION times easier and cleaner to leave the plastic wrap on!!! Just make sure you glue gun every once in awhile to keep things in place.


Glue gun on your big roses in a circle around the center of the wreath.


Start filling in little roses. I recommend starting on the inside, but it probably really doesn't matter! This is where it's up to you how far back you want your roses to go and how squished together you want them to be.


Making progress...


Ta-Daaaaaa!


Well, not really. Mine still needed something.

So here is where you add your pearls!


Big pearls in big roses and little pearls in little roses. Please expect to fry your fingertips with the little pearls. I found I made less of a glue gun stringy mess if I put the glue on the pearl and not on the flower. Hence the burns...

Close up of your finished product:


See?! It needed the pearls!

My husband calls this my "Quiet Book Wreath" since it's made out of felt. Sigh...

Let me know if you try it!

Monday, February 3, 2014

Iolite #9

So.... This is my new friend's fault!

I was mentioning that I was going to try to enter other sketch contests since Kiwi Lane is only twice a month now, and mentioned that I liked Scrapbook Steals Mid-Week-Mojo sketches, and mentioned that I was too far behind in the series to get started...

And the crazy woman convinced me that I could catch up!

And I believed her!!

So here is Iolite #9:


And here is my two-page version:


Yep, sketch #9 out of 10 and I am trying to get all 8 before that done! In a week! Crazy!

But I might get a whole ton of scrapbooking accomplished!


The title really isn't invisible, just hard to photograph! I tried to alter my Thickers to look like hail. I think I got close.

The pictures you can't see are my baby playing in the hail Daddy brought inside. They're cute!

Go HERE to see other interpretations.

Darn you Kristy Lee!!!

Saturday, February 1, 2014

February Layout

Here is the layout my Close To My Heart scrapbooking group will be making sometime this month:


 We are using the Sarita Paper Packet, Lagoon Houndstooth Washi Tape, and Aqua Dots.


I have to admit this was NOT my favorite paper packet! But once I got playing with it, I ended up really liking all the colors and patterns!


I used the washi tape to "line" the edges of my Colonial White paper. I LOVE how it looks!

Contact me if you are in the Utah County area and would like to join us sometime :)